|
|
|
|
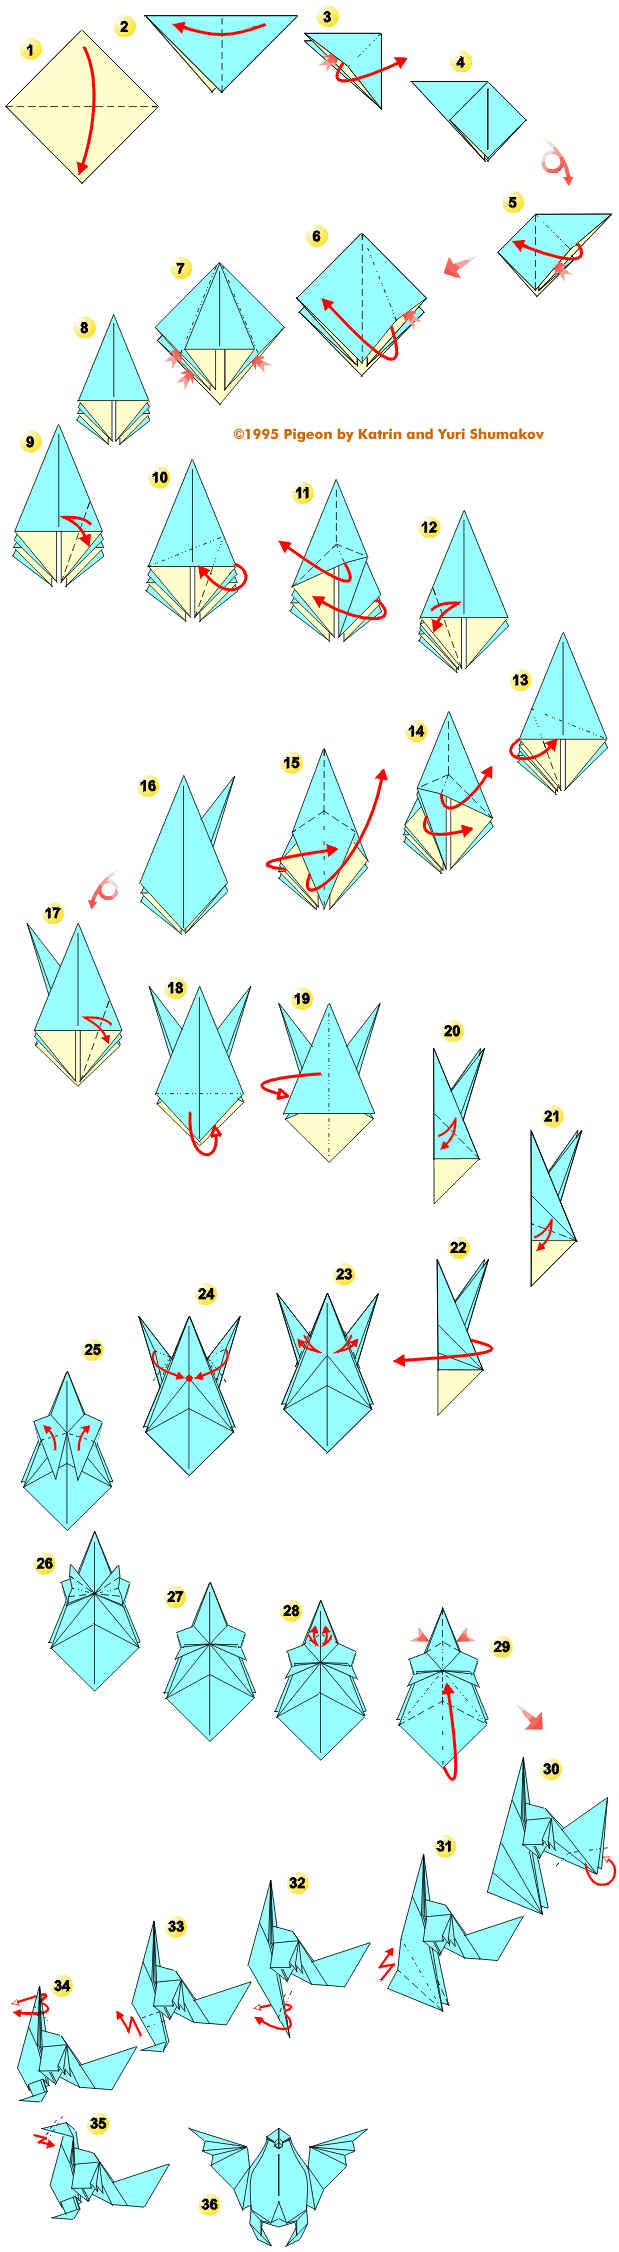
| Use a 20 cm
(8-inch) square of paper. This model uses a snail base as a foundation. Each base is named after the best-known model for which it is used. So in honor of this model the Shumakovs named one of newest origami bases. 1 Valley fold the opposite corners together in turn to mark the diagonal fold-line. 2 Valley fold it in half from right to left. 3 Lift the top half up along the middle fold-line. Open out the paper and squash it down neatly into square. 4 The result. Turn the model over. 5 Repeat step 3. 6 Here is completed the "square base" or "preliminary fold". Open out the right-hand flap of paper and squash it into a triangle. 7 Repeat step 6 for other sides. 8 This should be the result. 9 Valley fold the front flap's lower sloping edge over, so it lie along the middle fold-line. Press the flat and unfold it. 10 Inside reverse fold right-hand point under front layer, at the same time mountain folding bottom edge of front layer as shown. 11 Lift the bottom edge up, to make a tent-like valley fold, at the same time valley folding the right-hand flap over to the left. 12 Valley fold and unfold the front flap's lower sloping edge over, so it lie along the middle fold-line. 13 Inside reverse fold right-hand point under front layer, at the same time mountain folding bottom edge of front layer as shown. 14 Lift the bottom edge up, to make a tent-like valley fold, at the same time valley folding the left-hand flap over to the right. 15 Lift the bottom corner up, at the same time valley folding the left-hand flap over to the right. 16 This should be the result. Turn the model over. |
 |
17
Repeat steps 9-16. 18 Mountain fold the top layer inside. 19 Mountain fold the model in half. 20 Valley fold and unfold model on border of an internal layer. 21 Valley fold and unfold the layers, dividing a corner in half. 22 Open out. 23 Valley fold and unfold left- and right-hand corners. 24 Open out the left- and right-hand flaps and squash it into a quadragle. 25 Valley fold the corners as shown. 26 Step fold the corners. 27 The result. 28 Valley fold and unfold the top corner, as though continuing lines of wings. Pay attention that the creases are limited, will be carried out not up to the end. 29 Lift the bottom corner up, simultaneously pulling together the lateral sides. The top should appear turned out. 30 Turn model by a side and mountain fold the corners of a tail inside. 31 Step fold the left-hand point, hiding a corner inside. 32 Outside reverse fold the bottom corners, forming legs (for convenience in figure one leg) is shown only. 33 Step fold each leg. 34 Outside reverse fold the top corners, forming a head. 35 Step fold the corner, forming a beak. 36 Pigeon is ready! |
| Hayvanlar Sayfasına Dön | ||
| Ana Sayfaya Dön |