| 1
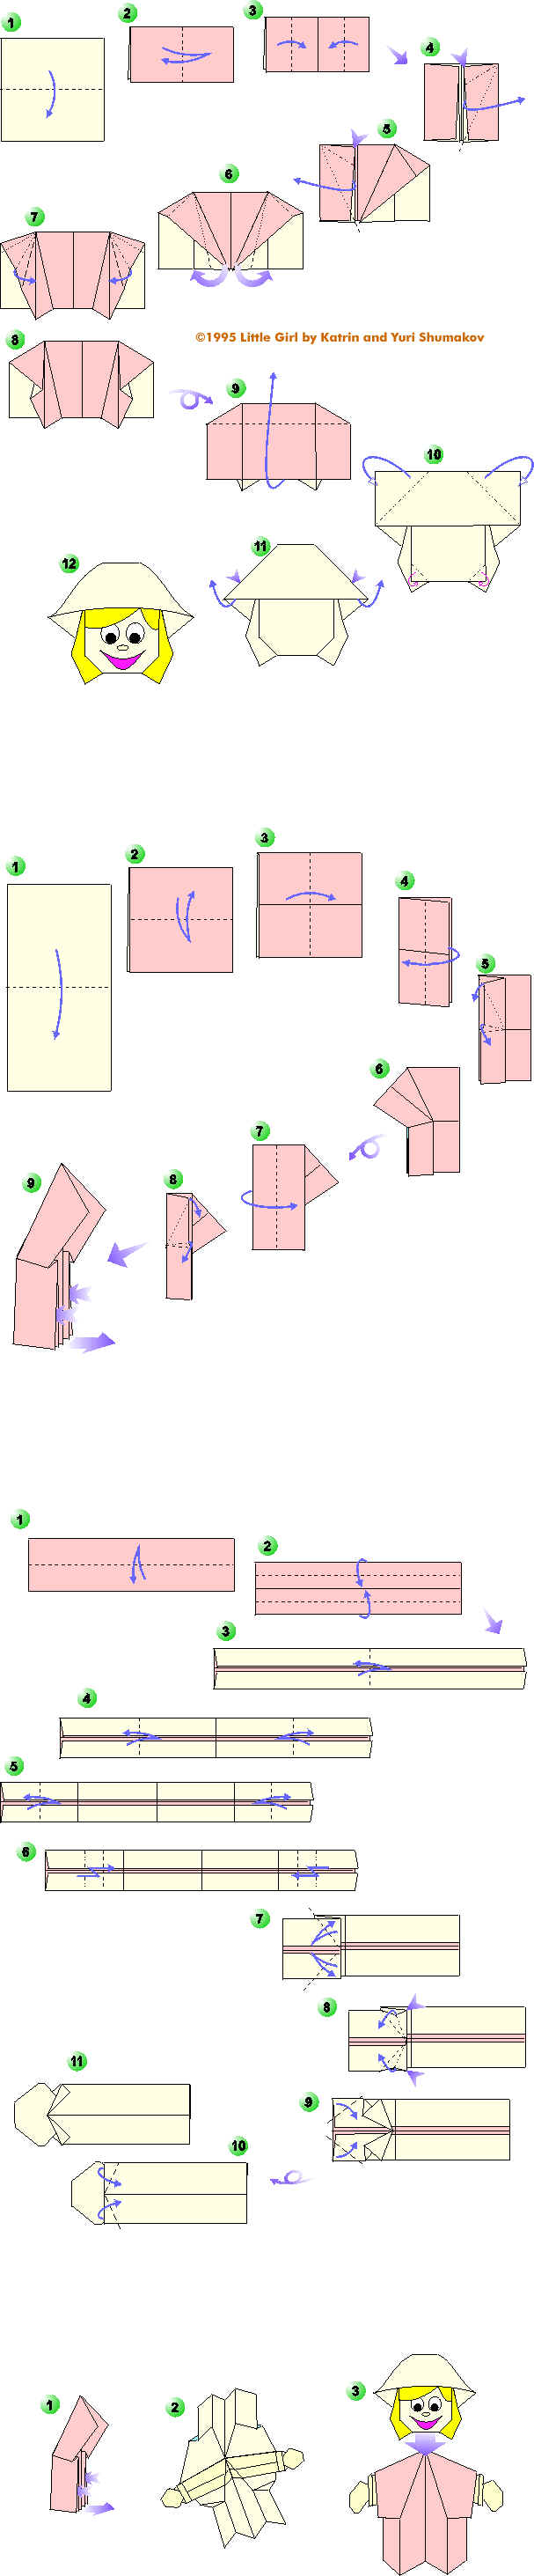
Bend a sheet half-and-half.
2
Fold and unfold on a vertical.
3 Fold the lateral
edges to the centre.
4 Open a crease to
the right so that second from above layer has developed on a diagonal.
5 Repeat for other
edge.
6 Displace corners
from the centre to a vertical line
7 Make the creases,
displacing little bit top lateral corners.
8,9 Turn the model
over and fold a layer upward.
10 Mountain fold the
corners back.
11 By undertaking
for corners of panama-hat, turn out them upward slightly.
12 Draw a hair,
eyes, smile... And the head the girl is ready.
THE BODY
Use a rectangle of paper, 10x20 cm (4x8 inch) in size.
1 Valley fold the sheet in half from top to bottom. Press the paper flat.
2 Valley fold the paper in half from top to bottom. Press it flat and
unfold it.
3 Valley fold the paper in half from side to side. Press it flat.
4 Valley fold the double layer in half over to meet the left-hand edge.
5 Move the top left-hand corner of the front flap in the direction shown by
the arrow, at the same time form a step fold in the middle of the front flap.
|
|
6 This should be the result. Turn the model over.
7 Valley fold the double layer in half over to meet the right-hand edge.
8 Move the top right-hand corner of the front flap in the direction shown by the
arrow, at the same time form a step fold in the middle of the front flap.
9 This should be the result. Move the bottom layers apart a little bit, that the
baby's body was steady. Here is the completed body for the paper doll!
THE
HANDS
Use a rectangle of paper, 5x20 cm (2x8 inch) in size.
1 Valley fold the paper in half from bottom to top. Press it flat and unfold it.
2 Valley fold the top and bottom edges over to meet the middle fold-line.
3 Valley fold the paper in half and unfold it.
4 Valley fold the sides over to meet the middle fold-line and unfold them.
5 Valley fold the left-hand
side over to meet the fold-line made in the previous step and unfold it. Repeat the same
for the right-hand side.
6 Step fold the ends, using
the fold-lines made in the previous steps as shown.
On the following diagrams one half of hands will be shown only because other half develops
similarly.
7 Valley fold the corners and unfold them.
8 Open out the "pockets" and squash them neatly.
9 Valley fold the corners as shown.
10 Turn the paper over. Valley fold the corners as far as it will go.
11 Repeat the previous steps for other side of the paper strip, thereby making
other hand... And the hands for the paper doll are ready.
ASSEMBLY
Open out the body, then put the hands as shown (it is possible to glue it) and close it.
Glue the head to the body.
The cheerful paper girl is ready!
|